
Top positive review
79 people found this helpful
Excellent Machine
By Frank W. on Reviewed in the United States on December 26, 2014
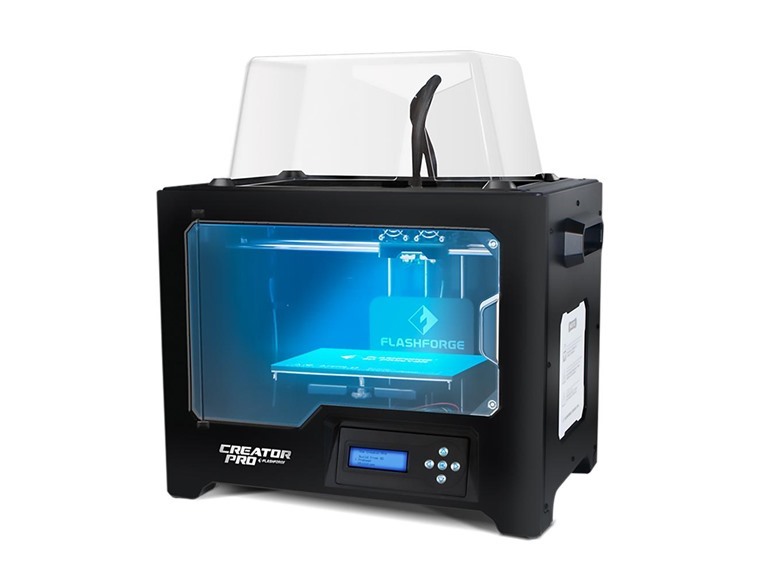
Short Story: I purchased the FlashForge 3d Printer Creator Pro in mid December 2014 and started using it on December 25th. I have printed ABS things that came with it, an ABS bicycle I created with SketchUp, and a wrench using PLA glow-in-the dark filament. Everything works great. This is a fantastic machine and technology. And I had a couple of questions and the legendary Tang answered the first email within an hour on Christmas Eve and the second email within an hour on Christmas morning (Central Standard Time). Great product, great service and the concept of 3d printing is really cool. Long Story: I got interested in 3d printing about a year ago and began shopping and reading web sites. I noticed that the machines were getting less expensive and per the reviews, more reliable. In early December I decided it was time to buy one and I suggested to my wife that I was going to do this and ‘it could be my Christmas present’. She said that was fine, but I could not open it until Christmas day. That was not what I intended but it turned out to be a good thing. For the 3 weeks or so before Christmas I read everything I could find about how to set up and use this printer. The first thing I discovered is that there is a lot of software involved, and three ways to get objects to the printer. First, you can download files from the internet. Second you can create an object then print it, and third you can buy a scanner, scan an object, and then print it. And you can combine elements of all of those. You could download a file, merge that with something you scanned, and then import that file into a 3D modeling software like Google SketchUp and modify it. I’m a baby boomer and we all learned things by reading the manual. Kids today never bothered with manuals so when they started inventing all this stuff they don’t bother writing manuals. You have to figure everything out by reading Customer Reviews and researching on the internet. Scanning. I purchased a Matter and Form MFS1v1 3d scanner. I wrote a review about it, so won’t repeat that here. It works. Create a Model of your own design. You have to learn to use a software program to do this. I selected SketchUp because there are good reviews and it is free. But there are no manuals. You load it on your PC, then work through 4 training tutorials provided by Google, then you just have to do google searches to try to figure out everything else you need to know to create an object that you can print. Here is what I learned about SketchUp essential to 3D printing: 1. Build your object in a large size, then let the printing software (more on that later) reduce it in size. SketchUp was developed as a 3d tool for architecture and lacks the ability to make very tiny parts. But you can make a big part with high detail then reduce it. 2. Every time you create an object on SketchUp – you must select it then “make a group”. Then you right-click and look at ‘Entity Info’. If you see ‘volume’ you have created a solid that will print on a 3d printer. If you try to print something that is not a solid the print software will discover “manifold” problems, and the print won’t work. 3. After you create solids, you join them together using a tool called “outer shell”. This is the tool on SketchUp 2015. I think tools on earlier versions had other names. You get to this tool by: View, Toolbars, Solid Tools. A bunch of solid objects joined together with ‘Outer Shell’ result in a model that can be printed. 4. When you first download Sketchup you get the Pro version (for 30 days). With the pro version you get other Solid Tools and you can output ‘object’ files. I got so frustrated that I could not get objects to print properly (just using the print preparation software – see below) that I bought the Pro version. I now don’t think you need it. The free version will output STL files and the Print Prep software can use either an “STL” file or and “OBJ” file 5. When you are finished building your object – export it as on OBJ file or Export it as an STL file. To export as an STL file you have to add the STL functionality to your SketchUp program. Again, just Google: “Add STL to Sketchup” and you will discover how to do this Convert your File to a Print File: Next – you prepare your file to print. This is required regardless of whether you download a model from the internet of use a model you created from SketchUp. You must have software that is capable of creating a file in the format expected by your printer. The Print File provides all the info the printer requires heat the extruders, move the print bed, move the extruders, push out the plastic, and so on. The directions that come with this printer instruct the user how to download free software and install it – along with other programs and drivers and so on. I found this baffling and for $140 bought Simplify3D, which is an alternative to the free software. Simplify3D has about 9 tutorials that explain how to use it. Remember, I’m killing time until Christmas and working through these was very helpful. When you first launch Simplify3D you tell it the brand and model of your printer. Then, as you import the model you either created or downloaded, the software has preconfigured processes to facilitate printing. You can change all these but I found the defaults to work great. When you are ready to print the software shows you an extruder suspended in space above a print bed and it prints your model, on your computer screen. You can watch it and use the “repair” menu to find all the problems – before even using the actual printer. When you have the model printing correctly on your PC, you move the file to the actual printer. But this is the cool thing – if you are thinking about buying a 3D printer – get SketchUp and buy Simplify3d. Make some models; see how they print. You can learn an awful lot before making the leap to buy the printer. Now to the FlashForge It came, from Amazon, in two days. It was packed well and everything was in it. The instructions for assembly are clear – but I also found a video of how to assemble a slightly older version that was helpful. This version includes an acrylic cover and front door that help keep the temperature constant which is useful for ABS printing. The instructions that come with the printer provide a web site with a video that shows how to assemble the acrylic cover that goes on the top of the machine. Hint: Take all the protective paper off the acrylic, use some of the painters’ tape that comes with the printer to tape the acrylic pieces together, install the screws, and remove the tape. This is a lot easier than the process in the video. It took 20 minutes and a lot of patience to get the print bed level. I finally settled on this procedure – Launch the ‘Level Build Plate’ on the printer, push the extruder assembly until it is right above the leveling wing-nut closest to you. Adjust that wing-nut until paper just barely slides; move extruder until it is above the other wing nuts and do the same thing. You just push it with your hands. Keep moving the extruder and adjusting the wing nuts until paper just slides, anywhere on the bed. Printing was the easiest part. First, I printed the objects that are on the SD card that comes with the machine. These printed fine. I was a little impatient getting the first print off the print bed, which has a layer of Kapton tape. I used a sharp knife from the kitchen to pop the model loose and actually cut into the tape. So on every subsequent print there is a little flap of Kapton tape sticking up. Note, however that when you use the Printing Software (in my example Simplify3D), you can check a box for “Include Raft”. When you do this, the printer creates a lattice of plastic under your actual object. That lattice just peels right off when finished. And the lattice covers up the Kapton tape tear and minor imperfections in levelling. Then I moved to printing from my PC. I could not load the driver necessary to connect my PC directly to the printer – but just copied ready-to-print files from Simplify3D to the SDCH card that came with the printer. Then put the SDCH card in the printer and it works fine. ABS. First 10 prints were using the ABS filament that came with the printer. I had studied all the settings and variables available to control the print – but when it came time to do it I just told the Simplify3D software that I was using ABS and wanted a ‘raft’ and everything came out fine. NOTE regarding “Supports”. The reason I bought a two extruder printer was because I thought you needed a second extruder to generate ‘supports’ for parts with a big overhang, using one of those soluble plastics that can later be dissolved. It turns out that the Simplify3D software (and probably most others) can print ‘supports’ just using the same ABS spool as your model. Somehow the supports are printed so they don’t stick very much and they just break off. The only time you would really need soluble supports is if they had to be printed inside your model where you could not easily remove them. PLA. Same story (almost). I backed out the ABS filament and loaded some PLA (that actually glows in the dark!). Everything had been printing so smoothly on the Kapton tape that I just told Simplify3D I was using PLA – and printed! I did not bother to use the Painters’ Tape as instructed because that would require re-leveling the print bed. The PLA print on the Kapton tape worked fine for about 10 minutes then the entire RAFT pulled loose and got caught against the extruder and I was not watching closely and a LOT of PLA got gummed up on the end of the extruder. Cleaned it up, installed a couple strips of painters’ tape, re-leveled and it prints fine. LESSON: follow the instructions. This machine and all the software are really fun. About the equivalent to a two hour college course, I think. I highly recommend this machine and the company that backs it up. 11/5/2018 Update: I have had this machine for 4 years. I had to replace the print nozzles when they got too clogged, and I NEVER use the dual nozzle feature but this machine is a champ. 11/16/2023 Update: That machine finally wore out. I could have emailed the vendor and purchased parts but I like the printer so much I just bought a new one. And meanwhile about 4 years ago I bought another one for a different house. I’m convinced this printer is the best one available. Sketchup (mentioned above) is much better now and it works great for 3d parts. One more suggestion: Use klapton tape on the bed and clean it every time with acetone. Replace the tape when it wears (maybe every 10 prints or so) and after removing the worn out tape clean the bed with alcohol. Strength: I bought a boat in 2017 that has an 8’ x 8’ Bimini top (big heavy monster). I got 2 Linco lifters and created brackets with this printer (and ABS+ plastic, 10 layers) to print the brackets that connect the lifters to the boat and to the top. Total force on these plastic brackets is about 100 lbs! This thing has worked flawlessly (use it to get the boat under a bridge) for 7 years now. One bracket cracked so I just pushed the button on the printer and made another one.
Top critical review
33 people found this helpful
Looks nice, but print jobs fail
By end user on Reviewed in the United States on June 23, 2016
Update 7-31-16: Received replacement printer on 7/28. Nothing has been fixed. Still uses all the cheapest chinese components. The left extruder clogged on the first use. 3 trashed jobs and counting. Obviously there was some printing done, according to the meter, but was it successful? Print jobs may get part way through, then just may a big blob. The top of print jobs looks like it came from an ice cream dispenser. I've tried a different heated print bed. I've removed the left noizzle. I've tried different filaments, different temps, different speeds, lots of included test prints. I hope the 2 provided spools of filament are enough to get this thing dialed in. Update 8-3-16: It isn't looking good. The heated bed never gets more than warm to the touch, although the display shows 100C, which should be the boiling point of water. No screech, yet, but the pulleys are clearly slipping. The left extruder is jammed, AGAIN! Rrgh! I may try some different parts on it. Sometimes, the display shows gibberish in the middle of a job, and the job ends. After this, the printer must be power cycled to be usable again. Other times, the print job just stops. Twice I've had the feed stop. I say it stopped, because the filament wasn't broken, or jammed. If I went to load filament, it would load, or I could cancel the job and start another job. Prints are coming out very rough. The jobs print a few lines, then there is a gap, then a few more lines. Little pieces of filament stick up all over. Update 8-6-16: Well, I have a few successes. The white filament supplied seems to be the only one that works. The red has lots of issues, given the same job and parameters. I tried changine the temp, changing the speed. Still bad. I've used up both included spools printing the same job over and over. In the process, I've found that choosing to print another copy doesn't print the exact same thing; one could be warped badly, another could have gaps, another could get knocked off the plate, etc. I found that, although this printer has a flat build plate, the gantry is crooked. It's racked, and as it prints it raises up in one corner. The feed mechanism has lots of issues. The buttons are often unresponsive. Acceleration shows as an option, but does nothing. The annoying interior strobe lighting is unhelpful. I've been unable to get the left extruder to work for more than a few meters of filament. The auto-level for the build plate is humorous. Since this isn't possible on this printer, why is is mentioned? I don't know which is more frustrating: the 3D printers that are total junk, the 3D printers with terrible support, the 3D printers that are close, but need better support, or the 3D printers that are great, but could be awesome. If you're wondering about support for this printer, see their (lack of) response. I compared this printer side by side with my aging 3D printer. My old printer wins on successes (fewer failures that this printer's successes), quality (the jobs are almost perfect on the other printer), speed (I can print the same job at 1.00 on the other printer, vs 0.20 on the flashforge), runtime (I have thousands of hours on the other printer, vs the flashforge that dies after a few hundred hours' use), parts availability (all local on the other printer), support (the flashforge support is people who don't know and couldn't care less), and usability (the constant crashing of the flashforge is irritating, as is the interior strobe lighting). Bottom line, if you never use this printer, it's great. If you do use it, use only the white filament provided. Once you've printed a few spools, this printer is done. Update 8-11-16: No reponse whatsoever from support. The printer died. Print kept stopping, and the display would go blank. I could power cycle and feed filament, but the feed would stop when the job started. This last time, power cycling did not restore functionality. Nothing comes up on the display. When powering on, the backlighting comes on, then dims, and a few seconds later everything goes dark. Returning this piece of junk. It didn't even last for 400 hours. Original 6-20-16: First impressions are good. This is my 7th 3D printer. Although the enclosure is plastic, it is a quality enclosure, with more design and fewer screws. The sides are solid, but the acryllic for the door and hood feels good. The hood is one piece, and fits securely. The side handles are built into the enclosure. Nothing flimsy. The door handle is similarly built into the door, where it vents out waves of heat. Throughout, the design was preferred to excess screws. This means easier maintenance. The unit feels solid, and does not rack. There are metal grates over the extruder fans. The wiring coming up the back has a nice channel built into the enclosure. The guide tubes are too long for the hood, which does have a big hole that lets the heat out. The guide tubes fit into a thick plate above the extruders, and extend well below the plate. This design prevents the tubes from popping out while printing. On the spool end, space is at a premium, but the guide tubes snap firmly into place, and there is a stop to prevent unwanted winding up on the spools. Unfortunately, the spool holder design fails here, in that the spools are too far from the enclosure where the tubes pull the filament, which causes the filament to get between the spool and the enclosure. No matter how tight the belts are, they slip terribly, because the pulleys are all plastic. In addition, warping seems to be an issue. The tilted display is nice, but the location of the SD card slot is such that lose filament can get into the slot. Also, the buttons aren't very responsive. The lighting is annoying, in that it is never really the right color or brightness. Printing must be done VERY slowly to prevent the belts from slipping (40 at 50%) At the start of every print job, there is a loud screeching noise. Nothing sticks to the blue pad on the build plate. The extruders are, thankfully, both at the same height, but they don't seem to be calibrated correctly, because the left side never matches up, when changing colors. The OS seems stable, thus far, and the info available (such as build statistics) is nice, as is the fact that many of the visible options work. One option I miss is the option to control the lighting. The first print job, the bed and extruders heated simultaneously, but they've never done that since, and it takes forever, either way. It is nice that the OS can read folders on the SD card. Acceleration does not appear to work, nor ditto. The unit does not waste filament with building those waste fences, but instead drops excess filament by wiping it on your print job. The extruder nozzles leak terribly. The tools come in a flimsy ziploc bag. Basically, you get 4 allen wrenches in a bag. As far as assembly, attatch the exteuders with 2 screws, attatch the inlet duct for the filament fan, remove the plastic wrap from the front door, put the hood in place, snap in the guide tubes and spool holders, and you're ready to go. Other than unpacking, removing the plastic wrap is the longest thing. Mine came with 2 spools of ABS filament. Be aware that the filament is on proprietary spools, and that their spool holders are not designed to be compatible with other spools. I'm at 16 failed jobs, zero successes, so far. I've contacted support concerning these issues. Update 6-25-16: Nothing but failures, so far. No response from support. Lots more issues have arisen. Dual extrusion is a no-go. Both extruders extrude simultaneously--even if your jobs only uses 1 extruder. Update 6-27-16: Still no response from support. I have 1 success to show for a whole spool of filament. The biggest problem that has arisen is that the profiles are uneditable. No matter what I choose during the make process, the printer applies its own settings. This wouldn't so bad if the settings were correct. Unfortunately, the offsets and temps are wrong. There are lots of excess noises when trying to print. The annoying lighting is terrible. Update 6-29-16: Still only 1 success, but many failures. 1800 meters of filament used, so far. Support replied. I've provided pics & videos of the problems. We're starting with the belt slippage, but in the meantime, the left extruder quit working. Update 7-11-16: There are some good features; unfortunately, none of them are related to the purpose of the printer. ”Cheap junk” is the best way to describe this unit. There are many issues, which haven't been resolved. I've sent the requested videos and pictures to support. I've spent numerous hours trying to fix the issues, and wasted spools of filament with test prints. 1. The belts slip terribly 2. There is a horrible screeching noise at the start of every print job. 3. There is a sound like shaken marbles while printing 4. I'm unable to turn of the multi-colored strobe light. That purple, pink, and blue light is obnoxious 5. No manual provided, electronic or otherwise. 6. The heads are out of alignment 7. Both heads just constantly extrude 8. The spool holders are the wrong size 9. The filament slips between the spool and the back of the device 10. The filament guide tubes are too long 11. The blue bed pad doesn't sit flat, and doesn't make a good print surface 12. The profiles have the wrong temp settings, but won't let me change them 13. It won't let me edit the print settings 14. Support doesn't seem to understand English 15. Print jobs warp terribly 16. The duct for the filament fan broke off when a job got messed up 17. The print bed doesn't heat properly (display shows 100C, but the bed is only warm to the touch) 18. The instructions on the display don't match the buttons 19. The buttons barely work at all. Even after multiple attempts of press and hold, no response from the buttons. 20. 2300 meters of filament, and only 1 successful print job 21. Even the samples on the SD card failed to print properly 22. The screws that mount the extruders to the gantry, and the screws for the motors come loose every few hours 23. Parts come from China, in 7-10 days 24. The filament guide tubes break after a few hundred hours of use. 25. The pulleys are made of cheap plastic 26. After 400 hours' use, the belts wore through or broke, and the unit basically fell apart. 27. The unit started shorting out 28. Power supply problems developed 29. I have probably 2 spools' worth of 3-inch pieces of filament in the trash can from just filament load failures. 30. I have more than 100 hours into trying to make this printer print. Perhaps that's too much to ask. I considered replacing all the cheap/bad parts, until I realized that the parts would cost almost as much as the printer itself, and I had already paid for those parts as part of the printer purchase. For this much money, I expected something that worked. Print jobs that print great on a makerbot are just trash on this printer.
Sort by:
Filter by:
By -
Verified Amazon Purchase
Vine Customer Review of Free Product
Sorry, no reviews match your current selections.
Try clearing or changing some filters.Show all reviews
Show more reviews